So you know you should be taking lots and lots of photos of your kids - from trips to the park, to Christmas morning, dance recitals, and first days of school, and the little moments in between - missing teeth, playing with favorite toys, and "helping" in the kitchen. If you don't get why it's important, check out this blog post, but if you're already convinced of the need and you're ready to jump into learning how to take better photos of your kiddos, keep reading!

The information I share here is not intended to be all-inclusive, or to prepare you to be a professional, and it certainly won't replace your camera's manual. It's just the basics that you need to know to shoot better photos of your kids. Please read your camera manual to see how to change the settings on your camera, then practice, practice, practice.

I did a little informal poll on facebook and everyone that responded had a DSLR, so a lot of what I'm going to say here applies to them, but even if you have a little point and shoot, or even just the camera on your phone, keep reading. The "rules" of composition and lighting still apply no matter what camera you use.
Please don't feel like you have to have a fancy camera to take photos. Yes, the image quality will be better with a DSLR, and a good compact camera will be better than an iPhone, but a "bad" photo is better than no photo. Also, you'd be surprised what you can get from a little camera if you know what you're doing with it. Last year, we spent 4 days at Indiana Dunes with the kids and I didn't even take my big camera. All of the photos I took were with my compact camera and I loved them! (To be fair, the small camera I use does have manual controls, but I only used them about half the time) It's not about the camera you use, it's about what you do with it. Buying a big fancy camera will NOT help you get better photos if you don't learn how to use it.

So, let's jump in. This first post will cover technical stuff, the basics you need to know before you learn anything else. Next week we'll get into the funner stuff.
The first topic we need to cover is exposure. Exposure just means how light or dark a photo is. Sure, you can keep your DSLR set to auto (the little green box on the mode dial), and sometimes it will give you the right exposure, and focus on the right thing, but sometimes it won't. If you want more control over what the camera captures, move the dial to 'M'.
Check out the photos below. They were taken in the same spot about 5 seconds apart. The photo on the left was taken in auto and the one on the right was taken in M (manual) mode. Notice how much brighter the one on the right is, and how the distracting background is blurred? That's the magic of manual mode.

There are three parts to getting the correct exposure: ISO, shutter speed, and aperture. Together, these are sometimes called the exposure triangle. Click this link to read a great, more in-depth explanation of the exposure triangle.
Your camera has a meter (read about it in your manual) but it's not always right. Experiment and check your photos on your camera's LCD screen for instant feedback. With practice, it will become second nature.
Remember film? Remember how it came in different "speeds" - 100,200, and 400 were the most common, sometimes 800. ISO is the same thing. The thing you need to remember about ISO is the lower the number, the more light you'll need to get proper exposure. So if it's a bright sunny day and you're outside, you should be safe with 100, but if you're inside next to a window you'll probably need around 400, and if you're somewhere darker you'll need 800, 1600, or maybe even higher, depending on what your camera can do. The higher your ISO, the more noise (grain) you'll see in your photos. Professional cameras handle it pretty well, but lower end cameras (like the Canon Rebel series) can't. So you should keep the ISO as low as the lighting conditions will allow.
The next part of the exposure triangle is shutter speed. The shutter speed is the length of time the camera's shutter is open and it's actually a fraction, so a shutter speed of 250 is actually 1/250 of a second. If you have a fairly steady hand and you're taking a photo of a child sitting still or sleeping, you can probably get by with a shutter speed of 1/100. I wouldn't go lower than that if you can help it. You'd be surprised what kind of blur you can get at that setting if a child decides to move. If you're taking a photo of a child actually doing something, the fast the better. 1/500 is usually pretty good. If you want blur for creative effect (to show motion), go with a slow shutter speed and a tripod. Just remember that the faster the shutter speed, the less light will be let in so you'll need to compensate with either a higher ISO or a different aperture.
Aperture refers to the opening in the lens that controls how much light is let in. The smaller the number, the bigger the hole, the more light is let in. Also, the smaller the number, the smaller the depth of field (area that's in focus). If you're using a DSLR, a 50mm 1.8 lens is a cheap and fun learning tool. You can probably get it for under $100 and you can get some really cool photos with it. Shooting "wide open" (the largest aperture/smallest number possible on your lens) is tricky. Until you master focusing, it's probably best to shoot keeping the aperture a stop or two smaller than the maximum. So if you're using the 50mm 1.8 lens, Try shooting at 2.2 or 2.8. You'll still get the shallow depth of field and lots of light let in, but it's a little more forgiving than 1.8. Also, be careful shooting more than one person with your lens wide open. Stop down a bit to make sure everyone stays in focus. Remember, a small number/big hole equals a smaller area that will be in focus.
Check out the photos below. I shot them both at ISO 160, shutter speed 1/1600, and aperture was f/2. The fast shutter speed captured my daughter swinging with no motion blur, and the large aperture gave me a smaller plane of focus which blurred the ugly background and made it less distracting.

If you're ready to try shooting in manual mode, just go for it! The great thing about digital cameras is the instant feedback. You can see right away if something is working or not. If you need more information, or just think I did a horrible job of explaining things, I've heard the book Understanding Exposure by Bryan Peterson is great. I've never read it - I learned this in a college class and we didn't use a book - but I've heard great things about it.
If you're shooting with a compact camera, or just don't want to shoot in manual mode on your DSLR, experiment with the different scene modes on your camera. Read your manual to find out what they all do. They can work wonders if you take the time to understand which ones to use in different situations.

The next thing to learn is focus. If you let your camera choose where to focus, it will usually focus on whatever is closest to the lens, which may or may not be what you want it to focus on. It's really easy to set your camera up to let you choose the focal point. Read your camera manual (or google it) to see how to do it on your camera. It will seem annoying at first, but if you practice with it it will become second nature, and it will make a huge difference in your photos. After you learn how to change the focal point, when you look through the viewfinder and press the shutter button halfway down you should see a little red box or dot. That's where the camera will focus. When you push the button down halfway, the camera focuses, then actually takes the photo when you push it all the way down. Keep the focal point on your child's eye for a close up, between the eyes if you're farther away, or wherever you want the focus to be.
I almost always choose my own focus point, even for snapshots. Seriously, once you start it will become a habit and you'll hardly even have to think about it. In the photos below, I focused on my son's eye in the photo on the left, since he was the star of the photo. In the photo on the right, I focused on the book since the purpose of that photo was to show what kind of books my older son is into right now (lots of classics and some 39 Clues).

With most DSLRs, you can also choose a focus mode. On a Canon, you can choose "one shot" if you're taking a photo of something or someone that is not likely to move. If you're shooting a moving subject, like your kid swinging or running, choose "AI servo" or AI focus" and the camera will track the subject and keep focusing until you take the photo. Read your camera manual for specifics.

The biggest problem most people have with their photos is the lighting. Always pay attention to where the light is coming from. There are lots of different lighting styles photographers use, but the ones you need to know are front lighting, back lighting, and side lighting. These apply inside as well as outside, and with any kind of camera.
You'll usually want nice, even lighting, wherever the light is coming from. So avoid dappled light, like under a tree, where there are spots of shadow and spots of bright light.
Front lighting is light that hits the front of the subject. So if your kid is standing facing the sun or a window, that's front lighting. It's probably the easiest kind of lighting, but watch out for squinting if the light is bright.
The photo below was taken using front light. It was around sunset and the boys were sitting facing west. Easy peasy.

If the light is coming from the side of the subject, that's side lighting. So if your child is beside a window but turned perpendicular to it, that's side lighting. It gives (good) shadows and adds interest.
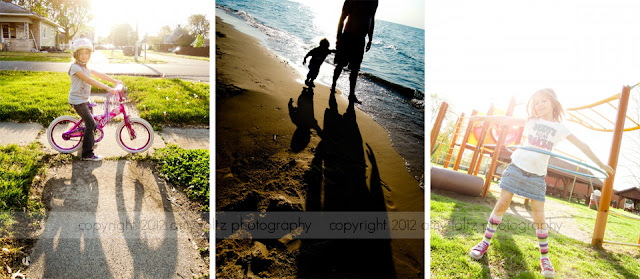
The photos below were both taken using side lighting. Notice how it gives nice, natural shadows and adds a little bit of interest.

Backlighting (when the light is behind the subject) is fun but tricky. You'll usually need to adjust your exposure because your camera will try to expose for the sky or wherever the light is coming from, which is only good if you're wanting a silhouette.
The photos below were all taken with backlighting. It's a little more dramatic, and a little harder to master, but it's kind of my favorite.
If you're outside at noon, your best bet is to find some open shade - like beside a building. Under a tree is not ideal because you're likely to get a green color cast in your photos. The best time for outdoor photos is early morning or evening. Avoid noon like the plague. There will be undereye shadows and squinty eyes.

None of my kids can seem to keep their eyes open when they look at the sky, even if it's really overcast. If your kids have the same problem, try having them close their eyes, then count to three. Take the photo as soon as they open their eyes. It doesn't work all the time, but sometimes that helps.
You can still use the sun for light if you're inside as long as you have some nice big windows to work with. Big glass doors are even better. You're usually better off to turn off your lights inside and use just the window light. Room lights can give weird color casts and just generally mess up the pretty natural light.
You'll need to experiment with your camera settings inside your house, but you'll probably need to bump up your ISO to at least 400 or so to start out with. Go from there and adjust your exposure triangle as needed.
The following photos were all taken inside with natural light.

If it's nighttime, you're better off using your flash, even if you have bright lights turned on. Light from lamps and ceiling lights is never flattering for photos. Keep reading for some tips on that.

I used to be seriously opposed to using flash. When I first started out, I read something about natural light being better, and I somehow took that to mean that I shouldn't ever need to use a flash. Yes, I absolutely prefer the look of natural light and use it whenever possible, but during my "anti-flash" phase, I missed and ruined so many cute photos of my kids. Sometimes you need the flash, so it's important to learn how to use it well.
If you're using a flash, remember to not point it directly at your kids. That pretty much never results in a great photo. If you're using a pop-up flash, get a flash diffuser or bouncer. Check Amazon or your local camera store. They're not expensive and it can make a big difference in your photos. Even on a compact camera, you can at least diffuse the flash to make it not quite so bright. Try holding a tissue or coffee filter in front of your flash and see what happens. Yes, it looks silly, but just try it.
If you're using a Speedlite or other external flash, learn to bounce it. All but the most basic flashes have rotating heads. You can point it at the wall behind you (the light will bounce off the wall and light your subjects from the front) or at the wall beside you (the light will bounce off the wall and give you side lighting). It takes some practice, and you'll need to fiddle with your exposure a bit, but once you learn it it's something that will make a big difference in your photos.
If you're looking to buy a flash, it's recommended to stay with the same brand as your camera, but you don't have to. I have a Canon 430EX and a Neewer TT560 and honestly I think they're both great. The Neewer was a lot cheaper but works just as well. One thing to look for in a flash (other than a rotating head) is the recycle time. You don't want to have to wait around for your flash to recycle before you can take another photo. You miss lots of shots that way. The batteries you use are important too, and definitely influence the flash's recycle time. I use Eneloop rechargeables and they are amazing.
The photo below was taken inside with bounced flash.

Check out the photos below. The one on the left was taken in auto mode with the pop-up flash with no diffuser or anything. The one in the middle was taken with natural light (windows behind and to the side of him). The one on the right was taken with an external flash bounced off the wall/ceiling.

I don't have an iPhone, so I don't have tips to share about it, but did find this post (thank you Pinterest) that looked fairly helpful: iPhone photography.
Hopefully some of that made sense to you. If you want more information, or if something wasn't clear, please leave me a comment here or on facebook and I'll try to help.
I'll do another post next week with tips on getting kids to cooperate for photos, then the weeks after that will cover composition/creativity, tips for special occasions (vacations, holidays, recitals), and organization, printing, and backup of your photos.

The information I share here is not intended to be all-inclusive, or to prepare you to be a professional, and it certainly won't replace your camera's manual. It's just the basics that you need to know to shoot better photos of your kids. Please read your camera manual to see how to change the settings on your camera, then practice, practice, practice.

I did a little informal poll on facebook and everyone that responded had a DSLR, so a lot of what I'm going to say here applies to them, but even if you have a little point and shoot, or even just the camera on your phone, keep reading. The "rules" of composition and lighting still apply no matter what camera you use.
Please don't feel like you have to have a fancy camera to take photos. Yes, the image quality will be better with a DSLR, and a good compact camera will be better than an iPhone, but a "bad" photo is better than no photo. Also, you'd be surprised what you can get from a little camera if you know what you're doing with it. Last year, we spent 4 days at Indiana Dunes with the kids and I didn't even take my big camera. All of the photos I took were with my compact camera and I loved them! (To be fair, the small camera I use does have manual controls, but I only used them about half the time) It's not about the camera you use, it's about what you do with it. Buying a big fancy camera will NOT help you get better photos if you don't learn how to use it.

So, let's jump in. This first post will cover technical stuff, the basics you need to know before you learn anything else. Next week we'll get into the funner stuff.
The first topic we need to cover is exposure. Exposure just means how light or dark a photo is. Sure, you can keep your DSLR set to auto (the little green box on the mode dial), and sometimes it will give you the right exposure, and focus on the right thing, but sometimes it won't. If you want more control over what the camera captures, move the dial to 'M'.
Check out the photos below. They were taken in the same spot about 5 seconds apart. The photo on the left was taken in auto and the one on the right was taken in M (manual) mode. Notice how much brighter the one on the right is, and how the distracting background is blurred? That's the magic of manual mode.

There are three parts to getting the correct exposure: ISO, shutter speed, and aperture. Together, these are sometimes called the exposure triangle. Click this link to read a great, more in-depth explanation of the exposure triangle.
Your camera has a meter (read about it in your manual) but it's not always right. Experiment and check your photos on your camera's LCD screen for instant feedback. With practice, it will become second nature.
Remember film? Remember how it came in different "speeds" - 100,200, and 400 were the most common, sometimes 800. ISO is the same thing. The thing you need to remember about ISO is the lower the number, the more light you'll need to get proper exposure. So if it's a bright sunny day and you're outside, you should be safe with 100, but if you're inside next to a window you'll probably need around 400, and if you're somewhere darker you'll need 800, 1600, or maybe even higher, depending on what your camera can do. The higher your ISO, the more noise (grain) you'll see in your photos. Professional cameras handle it pretty well, but lower end cameras (like the Canon Rebel series) can't. So you should keep the ISO as low as the lighting conditions will allow.
The next part of the exposure triangle is shutter speed. The shutter speed is the length of time the camera's shutter is open and it's actually a fraction, so a shutter speed of 250 is actually 1/250 of a second. If you have a fairly steady hand and you're taking a photo of a child sitting still or sleeping, you can probably get by with a shutter speed of 1/100. I wouldn't go lower than that if you can help it. You'd be surprised what kind of blur you can get at that setting if a child decides to move. If you're taking a photo of a child actually doing something, the fast the better. 1/500 is usually pretty good. If you want blur for creative effect (to show motion), go with a slow shutter speed and a tripod. Just remember that the faster the shutter speed, the less light will be let in so you'll need to compensate with either a higher ISO or a different aperture.
Aperture refers to the opening in the lens that controls how much light is let in. The smaller the number, the bigger the hole, the more light is let in. Also, the smaller the number, the smaller the depth of field (area that's in focus). If you're using a DSLR, a 50mm 1.8 lens is a cheap and fun learning tool. You can probably get it for under $100 and you can get some really cool photos with it. Shooting "wide open" (the largest aperture/smallest number possible on your lens) is tricky. Until you master focusing, it's probably best to shoot keeping the aperture a stop or two smaller than the maximum. So if you're using the 50mm 1.8 lens, Try shooting at 2.2 or 2.8. You'll still get the shallow depth of field and lots of light let in, but it's a little more forgiving than 1.8. Also, be careful shooting more than one person with your lens wide open. Stop down a bit to make sure everyone stays in focus. Remember, a small number/big hole equals a smaller area that will be in focus.
Check out the photos below. I shot them both at ISO 160, shutter speed 1/1600, and aperture was f/2. The fast shutter speed captured my daughter swinging with no motion blur, and the large aperture gave me a smaller plane of focus which blurred the ugly background and made it less distracting.

If you're ready to try shooting in manual mode, just go for it! The great thing about digital cameras is the instant feedback. You can see right away if something is working or not. If you need more information, or just think I did a horrible job of explaining things, I've heard the book Understanding Exposure by Bryan Peterson is great. I've never read it - I learned this in a college class and we didn't use a book - but I've heard great things about it.
If you're shooting with a compact camera, or just don't want to shoot in manual mode on your DSLR, experiment with the different scene modes on your camera. Read your manual to find out what they all do. They can work wonders if you take the time to understand which ones to use in different situations.

The next thing to learn is focus. If you let your camera choose where to focus, it will usually focus on whatever is closest to the lens, which may or may not be what you want it to focus on. It's really easy to set your camera up to let you choose the focal point. Read your camera manual (or google it) to see how to do it on your camera. It will seem annoying at first, but if you practice with it it will become second nature, and it will make a huge difference in your photos. After you learn how to change the focal point, when you look through the viewfinder and press the shutter button halfway down you should see a little red box or dot. That's where the camera will focus. When you push the button down halfway, the camera focuses, then actually takes the photo when you push it all the way down. Keep the focal point on your child's eye for a close up, between the eyes if you're farther away, or wherever you want the focus to be.
I almost always choose my own focus point, even for snapshots. Seriously, once you start it will become a habit and you'll hardly even have to think about it. In the photos below, I focused on my son's eye in the photo on the left, since he was the star of the photo. In the photo on the right, I focused on the book since the purpose of that photo was to show what kind of books my older son is into right now (lots of classics and some 39 Clues).

With most DSLRs, you can also choose a focus mode. On a Canon, you can choose "one shot" if you're taking a photo of something or someone that is not likely to move. If you're shooting a moving subject, like your kid swinging or running, choose "AI servo" or AI focus" and the camera will track the subject and keep focusing until you take the photo. Read your camera manual for specifics.

The biggest problem most people have with their photos is the lighting. Always pay attention to where the light is coming from. There are lots of different lighting styles photographers use, but the ones you need to know are front lighting, back lighting, and side lighting. These apply inside as well as outside, and with any kind of camera.
You'll usually want nice, even lighting, wherever the light is coming from. So avoid dappled light, like under a tree, where there are spots of shadow and spots of bright light.
Front lighting is light that hits the front of the subject. So if your kid is standing facing the sun or a window, that's front lighting. It's probably the easiest kind of lighting, but watch out for squinting if the light is bright.
The photo below was taken using front light. It was around sunset and the boys were sitting facing west. Easy peasy.

If the light is coming from the side of the subject, that's side lighting. So if your child is beside a window but turned perpendicular to it, that's side lighting. It gives (good) shadows and adds interest.
The photos below were both taken using side lighting. Notice how it gives nice, natural shadows and adds a little bit of interest.

Backlighting (when the light is behind the subject) is fun but tricky. You'll usually need to adjust your exposure because your camera will try to expose for the sky or wherever the light is coming from, which is only good if you're wanting a silhouette.
The photos below were all taken with backlighting. It's a little more dramatic, and a little harder to master, but it's kind of my favorite.

If you're outside at noon, your best bet is to find some open shade - like beside a building. Under a tree is not ideal because you're likely to get a green color cast in your photos. The best time for outdoor photos is early morning or evening. Avoid noon like the plague. There will be undereye shadows and squinty eyes.

None of my kids can seem to keep their eyes open when they look at the sky, even if it's really overcast. If your kids have the same problem, try having them close their eyes, then count to three. Take the photo as soon as they open their eyes. It doesn't work all the time, but sometimes that helps.
You can still use the sun for light if you're inside as long as you have some nice big windows to work with. Big glass doors are even better. You're usually better off to turn off your lights inside and use just the window light. Room lights can give weird color casts and just generally mess up the pretty natural light.
You'll need to experiment with your camera settings inside your house, but you'll probably need to bump up your ISO to at least 400 or so to start out with. Go from there and adjust your exposure triangle as needed.
The following photos were all taken inside with natural light.

If it's nighttime, you're better off using your flash, even if you have bright lights turned on. Light from lamps and ceiling lights is never flattering for photos. Keep reading for some tips on that.

I used to be seriously opposed to using flash. When I first started out, I read something about natural light being better, and I somehow took that to mean that I shouldn't ever need to use a flash. Yes, I absolutely prefer the look of natural light and use it whenever possible, but during my "anti-flash" phase, I missed and ruined so many cute photos of my kids. Sometimes you need the flash, so it's important to learn how to use it well.
If you're using a flash, remember to not point it directly at your kids. That pretty much never results in a great photo. If you're using a pop-up flash, get a flash diffuser or bouncer. Check Amazon or your local camera store. They're not expensive and it can make a big difference in your photos. Even on a compact camera, you can at least diffuse the flash to make it not quite so bright. Try holding a tissue or coffee filter in front of your flash and see what happens. Yes, it looks silly, but just try it.
If you're using a Speedlite or other external flash, learn to bounce it. All but the most basic flashes have rotating heads. You can point it at the wall behind you (the light will bounce off the wall and light your subjects from the front) or at the wall beside you (the light will bounce off the wall and give you side lighting). It takes some practice, and you'll need to fiddle with your exposure a bit, but once you learn it it's something that will make a big difference in your photos.
If you're looking to buy a flash, it's recommended to stay with the same brand as your camera, but you don't have to. I have a Canon 430EX and a Neewer TT560 and honestly I think they're both great. The Neewer was a lot cheaper but works just as well. One thing to look for in a flash (other than a rotating head) is the recycle time. You don't want to have to wait around for your flash to recycle before you can take another photo. You miss lots of shots that way. The batteries you use are important too, and definitely influence the flash's recycle time. I use Eneloop rechargeables and they are amazing.
The photo below was taken inside with bounced flash.

Check out the photos below. The one on the left was taken in auto mode with the pop-up flash with no diffuser or anything. The one in the middle was taken with natural light (windows behind and to the side of him). The one on the right was taken with an external flash bounced off the wall/ceiling.

I don't have an iPhone, so I don't have tips to share about it, but did find this post (thank you Pinterest) that looked fairly helpful: iPhone photography.
Hopefully some of that made sense to you. If you want more information, or if something wasn't clear, please leave me a comment here or on facebook and I'll try to help.
I'll do another post next week with tips on getting kids to cooperate for photos, then the weeks after that will cover composition/creativity, tips for special occasions (vacations, holidays, recitals), and organization, printing, and backup of your photos.


2 comments
This is wonderful! It is great of you to share some of your expertise with us to help make our snapshots a little bit better!
ReplyDeleteSo glad you thought it was helpful! Keep checking back, there will be more! :-)
ReplyDelete