We've covered camera basics and how to get your kids to cooperate, so now it's time to talk about how to take interesting photos.

The first thing is composition. Here's a couple of tips to help, but remember that you don't want to use each one all the time. You don't want all your photos to be close-ups, or all your photos to have off-center subjects! Variety is a good thing. The best thing to do (assuming you have time for more than one photo) is to take a quick, wide angle shot of whatever they're doing, then slowly move in and around and take more from different angles and vantage points. Zoom in and take detail photos too. When you're all done, it's easy to pick your three or four favorites and delete the rest. Don't be afraid to experiment!
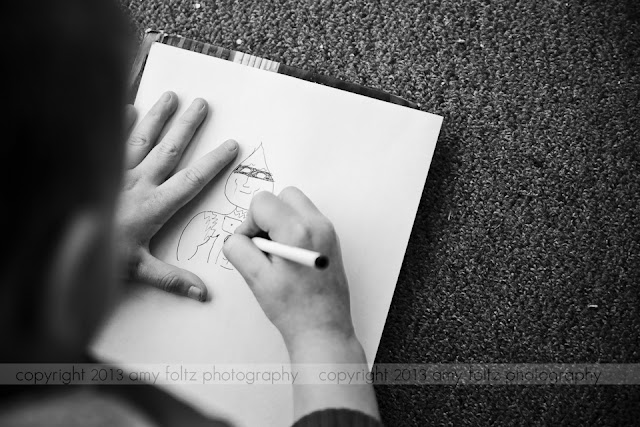
1. Simplify the scene. This is one of the very first things my dad ever taught me about photography. I was probably about 12 or so and asked him to take me out to take some "good pictures" (I thought anything taken with his SLR was "good") and we were driving along a back road and it was snowy and he told me to not look at the whole scene, but to pick a part of it to focus on. I think I took a photo of a railroad crossing sign with some snow or ice on it. Probably not the most interesting thing I could have chosen, but he made his point and it's stuck with me. So say your kids are busy playing nicely in the middle of a crowded bedroom and you want to capture the moment without the mess. Get close, or zoom in, or stand in a different spot, whatever you have to do to get what you want in the photo and not what you don't want.
Check out the two photos below. The one on the left was just taken quickly as I walked in the room (amazed that they were playing together so nicely for a change) and the one of the left was taken from a different vantage point with less clutter. Also, don't think that every photo has to show faces.

Now check out these photos. The one on the left was just a quick shot, without much thought given to it. The two on the right show only what I wanted. They're actually both in our album for last year, but it's good to have a variety - wide shots to set the scene and closer shots for details.

Now for one more example. Check out the photo on the left. My daughter decided the tree needed decorated so she took a branch from a bush we had just cut down, and some dandelions, and got busy. The first shot shows what she's doing, but the second shot is so much better. They were both taken with the same lens, same settings, and just a few seconds apart. The only thing that changed is where I was standing. Notice how being closer to her threw the background more out of focus, taking away the distraction of the road and the neighbor's house behind her.

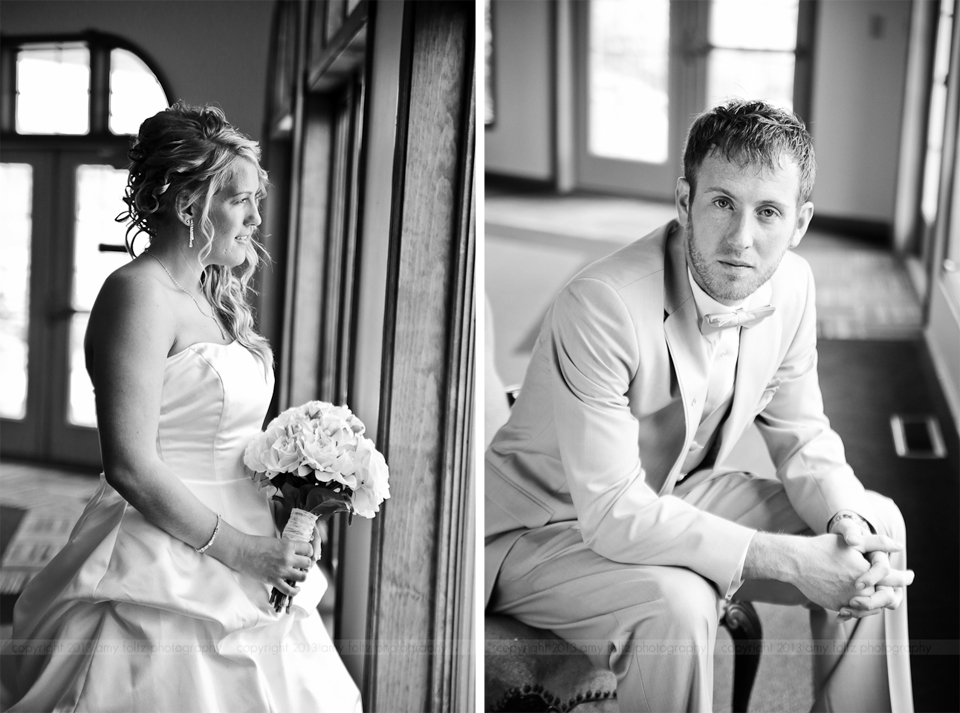
2. Avoid the center. If you want a photo to really stand out, try making your subject off-center. Ever heard of the rule of thirds? If you divide an image into thirds horizontally and vertically, you should try to place your subject on one of the lines or on the intersection of two of those lines. Check out the images below for examples.


For a close-up, the eyes are considered the "subject" or center of attention.

If you want more tips on composition, you can check out this blog post, this one, or this one.
Another way to take more creative photos is to vary your vantage point. Vantage point just means where you are taking the photo from. For the most part, images of kids look best when taken from their eye level, not your own. So get down to their level, or bring them up to yours.


Of course, your photos would get a little boring if they were all taking from this vantage point, so mix it up a little. Try using a low or high vantage point once in a while for interest. This looks best if it's from a really low or really high point.


Another way to add variety to your photos is through the creative use of shutter speed and aperture. I usually use a fairly fast shutter speed to stop motion, but you can also intentionally use a slower one to show motion. This is most often used to show the movement of light (car lights or fireworks) or water (like waterfalls) but can also be used for other things. Search for slow shutter speed on Flickr for some great examples.
Aperture is a really fun tool to use to very clearly show what you want the viewer to notice when they look at your photos. A large aperture/small number (go back and read part one of this series if you don't understand that) will give you a smaller depth of field, which means that less of the photo will be in focus. You can use this to your advantage to lead the viewer's eye exactly where you want it.


This image is a good example of both a low vantage point and a large aperture used to blur a distracting background and simplify the scene.

So now that you have some ideas, go out and practice and experiment and have fun!
Next time I'll share tips for holidays, vacations, recitals/plays, snow, fireworks, and sports. If you have any questions or ideas for topics to cover, leave a comment here or on facebook, or click here to contact me. I'd love to hear from you!

The first thing is composition. Here's a couple of tips to help, but remember that you don't want to use each one all the time. You don't want all your photos to be close-ups, or all your photos to have off-center subjects! Variety is a good thing. The best thing to do (assuming you have time for more than one photo) is to take a quick, wide angle shot of whatever they're doing, then slowly move in and around and take more from different angles and vantage points. Zoom in and take detail photos too. When you're all done, it's easy to pick your three or four favorites and delete the rest. Don't be afraid to experiment!
1. Simplify the scene. This is one of the very first things my dad ever taught me about photography. I was probably about 12 or so and asked him to take me out to take some "good pictures" (I thought anything taken with his SLR was "good") and we were driving along a back road and it was snowy and he told me to not look at the whole scene, but to pick a part of it to focus on. I think I took a photo of a railroad crossing sign with some snow or ice on it. Probably not the most interesting thing I could have chosen, but he made his point and it's stuck with me. So say your kids are busy playing nicely in the middle of a crowded bedroom and you want to capture the moment without the mess. Get close, or zoom in, or stand in a different spot, whatever you have to do to get what you want in the photo and not what you don't want.
Check out the two photos below. The one on the left was just taken quickly as I walked in the room (amazed that they were playing together so nicely for a change) and the one of the left was taken from a different vantage point with less clutter. Also, don't think that every photo has to show faces.

Now check out these photos. The one on the left was just a quick shot, without much thought given to it. The two on the right show only what I wanted. They're actually both in our album for last year, but it's good to have a variety - wide shots to set the scene and closer shots for details.

Now for one more example. Check out the photo on the left. My daughter decided the tree needed decorated so she took a branch from a bush we had just cut down, and some dandelions, and got busy. The first shot shows what she's doing, but the second shot is so much better. They were both taken with the same lens, same settings, and just a few seconds apart. The only thing that changed is where I was standing. Notice how being closer to her threw the background more out of focus, taking away the distraction of the road and the neighbor's house behind her.

2. Avoid the center. If you want a photo to really stand out, try making your subject off-center. Ever heard of the rule of thirds? If you divide an image into thirds horizontally and vertically, you should try to place your subject on one of the lines or on the intersection of two of those lines. Check out the images below for examples.


For a close-up, the eyes are considered the "subject" or center of attention.

If you want more tips on composition, you can check out this blog post, this one, or this one.
Another way to take more creative photos is to vary your vantage point. Vantage point just means where you are taking the photo from. For the most part, images of kids look best when taken from their eye level, not your own. So get down to their level, or bring them up to yours.


Of course, your photos would get a little boring if they were all taking from this vantage point, so mix it up a little. Try using a low or high vantage point once in a while for interest. This looks best if it's from a really low or really high point.


Another way to add variety to your photos is through the creative use of shutter speed and aperture. I usually use a fairly fast shutter speed to stop motion, but you can also intentionally use a slower one to show motion. This is most often used to show the movement of light (car lights or fireworks) or water (like waterfalls) but can also be used for other things. Search for slow shutter speed on Flickr for some great examples.
Aperture is a really fun tool to use to very clearly show what you want the viewer to notice when they look at your photos. A large aperture/small number (go back and read part one of this series if you don't understand that) will give you a smaller depth of field, which means that less of the photo will be in focus. You can use this to your advantage to lead the viewer's eye exactly where you want it.


This image is a good example of both a low vantage point and a large aperture used to blur a distracting background and simplify the scene.

So now that you have some ideas, go out and practice and experiment and have fun!
Next time I'll share tips for holidays, vacations, recitals/plays, snow, fireworks, and sports. If you have any questions or ideas for topics to cover, leave a comment here or on facebook, or click here to contact me. I'd love to hear from you!


